
How To Build or Buy a Basement Sauna Without Causing a Disaster

Build Your Complete Basement Sauna Package Here

Building a basement sauna requires careful planning, attention to detail, and adherence to safety guidelines. It's recommended to consult professionals, such as contractors, electricians, and sauna experts, to ensure a successful and safe installation.
Never install a basement sauna in a basement with water or mold problems. A dry, solid foundation is required.
An associate at Sauna Marketplace can connect you with experts or additional DIY sauna-building support.
Once properly planned, we've seen basement saunas built in one day. Let’s dive into the step-by-step process of how you can plan and build your very own basement sauna.
Required Tools
Here's what you need to get started:
- Drill
- Circular Saw (a miter saw can also be helpful)
- Air compressor and finish nailer
- Table saw
- Stapler
- Hammer
- Knife
1. Planning and Designing Your Basement Sauna
First, determine where to install a sauna heater and floor drain in your basement. These limitations can significantly influence your sauna's overall layout.
Basement saunas use electric sauna heaters, so you must select a spot where power can be run to it. Consider if there's enough room for a double pole breaker in your electrical box, and plan for lighting and other power requirements.
In general, a basement sauna will need an 8 or 10 gauge wire size, 240 volt service and one or two 120 volt circuits for ventilation, lighting, and outlets.
Next, consider if there is an outside wall or two the sauna can share. We will be framing out an additional wall inside the foundation, but it's nice to have easy access to an exterior wall for ventilation. This also makes it possible to bring in natural light or to include a window.
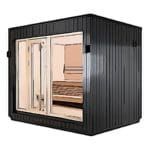
Next, consider the sauna's size, which ranges from 4x4 to 12x16 feet. The ceiling should ideally be AT LEAST 7 feet tall. If the ceiling is lower than this, you might not have enough height for a top bench.
It's very difficult to get even temperatures in basement saunas with low ceilings due to heat stratification. A Saunum sauna heater and air equalizer is usually the only way to achieve a very high quality sauna in the constraints of a basement sauna. Saunum's take the best heat and steam that builds up above the heater and distribute it throughout the sauna.
Saunums have specific clearances, and it's best to decide early on if you will use one.
With the practicalities taken care of, you can focus on the sauna layout. Begin with a bench across the longest wall. You'll want to keep the top bench as high as possible in a basement sauna without causing any head-banging accidents. Then depending on how much space is left, locate a lower bench or step below it.
The sauna door should always swing out for safety reasons.
These are the full glass sauna doors we recommend.
2. Installation of the Floor Drain (optional)
With a basic sauna layout planned, it's time to install the floor drain.
This can involve some serious demolition, such as tearing up concrete in your basement, so consider hiring a professional for this part. Ensure the floor is sloped towards the drain to ensure proper water drainage.
Not everyone agrees they are necessary, especially in a basement sauna. If the basement is below grade and lacks mechanical ventilation we recommend keeping the sauna sessions fairly dry with only occasional water on rocks.
It also helps to run the heater for 30 minutes after the sauna session with vents and doors open to dry it out. With proper thought and care, you can get by without a drain.
3. Framing the Sauna
Start by framing your sauna walls using standard wall framing techniques with 2x4s and a header over the door.
Once the walls are built, it's time to rough in your electrical cables to lighting, outlets, mechanical ventilation, and sauna heater locations.
4. Add ventilation
In basement saunas, we strongly recommend mechanical ventilation that takes hot humid air outside. Basements often have mold and humidity problems in the spring and summer, even without a sauna. You may be tempted to keep the free heat in the house, and on occasion, that's OK. But you will want mechanical ventilation in the spring and summer.
Method 1: Exhaust air from the ceiling on the opposite corner from the heater to the exterior. This fan will only be used after the sauna sessions.
Method 2: Exhaust air from below the bench to the exterior using a powered blower that can handle sauna temperatures. This has the benefit of being used during the sauna to help draw hot air down and promote fresh air to come through the passive intake vent next to the heater.
Both methods can alternatively exhaust air into an adjacent room that has a standard bathroom exhaust fan to outdoors.
We recommend using both methods when possible.
All saunas require a passive air intake vent near the heater. Ideally, this would come from outdoors and also have a booster fan to bring in more fresh air when desired.
If you choose not to use a powered exhaust vent outdoors, ensure you have a large gap under the sauna door, preferably a vent or two into adjacent rooms. Many air out their saunas by leaving the door open after use with no problem.
5. Rough In Electric
Run electrical cables to lighting, outlets, mechanical ventilation, and sauna heater locations.
You'll want to have your sauna heater narrowed down, so your electrician will be able to determine a cable size that will work. It's a good idea to "size up" the cable if you ever want to install a larger heater.
Select "wet-rated" ceiling lights and run power to those locations. Small, black casing recessed lights look cool. These are our favorites because they're dimmable, and you can adjust the color temperature.
Electrical note: make sure any outlets in or near the sauna have vapor proof boxes and are GFCI protected. The sauna heater probably won't need GFCI protection but check specs.
We recommend these LED light strips under benches and/or behind backrests. They can be either plugged into a standard outlet or hardwired to your HUUM, Harvia, Saunum, or IKI power box.
6. Insulation and Foil Barrier
After the framing is completed, you'll need to fill the wall and ceiling cavities with mineral wool insulation, also known as rockwool. It's non-flammable, moisture-resistant, and it has a higher R-value per inch compared to fiberglass. Use R-13-15 for the walls and R-19 for the ceiling. This insulation is especially suitable for high-temperature applications like saunas.
*Make sure to get formaldehyde free Rockwool or mineral wool. See video at end of this post to get this right.
7. Add Vapor Barrier
Cover the insulation with a foil vapor barrier once the insulation is in place. This step is essential for the sauna environment.
It reflects the heat into the room and prevents moisture from penetrating the walls and ceiling. Ensure you have tightly stapled the foil to the studs and that all seams are carefully taped.
Buy our recommended sauna foil here.
8. Installing the Sauna Door
Your sauna door should be installed next. It is commonly a pre-hung type that can be ordered from Sauna Marketplace, with insulated glass panels to prevent heat loss.
Ensure that it opens outwards for safety reasons in case someone inside the sauna feels unwell and needs to exit quickly.
9. Installing the Sauna Heater
Before installing the heater, check with your local electric codes. It might be necessary to hire a licensed electrician to do the job. The heater typically goes on the wall opposite the door, but always follow the manufacturer’s guidelines.
Once installed, ensure a safe distance between the heater and anything flammable, including the wooden walls and benches. This gap varies depending on the heater model, so refer to your heater’s manual for specifics.
See our choices for the best sauna heaters here.
10. Installing the Sauna Benches
Bench installation is a crucial part of sauna building. The higher bench is typically around 3 feet off the ground, with a lower one about 1.5 feet below. If you have a larger sauna, you can install an L-shaped bench. Remember to sand your benches and corners well for comfort and to prevent splinters.

New prebuilt bench modules are available here.
11. Wall and Ceiling Paneling
The final construction step is to install your wall and ceiling paneling. Tongue and groove cedar is most popular in the US, but unheard of in Finland.
Consider Thermo-Alder, Thermo-Aspen, Thermo-Spruce, or Alder. All these are available in the US as custom orders on Sauna Marketplace.
Start from the bottom and work up to ensure a tight seal against the foil barrier.
12. Finishing Steps
After you finish the construction, clean your sauna thoroughly, removing any dust or debris. Now, you can plug in the heater, set the thermostat, and give your new sauna a test run.
Remember to maintain your sauna properly by cleaning it regularly and checking the heater and other equipment for any faults.
Conclusion and FAQ
Building a sauna in your basement is a complex project but can be very rewarding. Safety comes first, so don't hesitate to consult with professionals and double-check your manuals for safety clearances.
We have a wide variety of sauna accessories on Sauna Marketplace, including thermometers/hygrometers, buckets and ladles, essential oils, sauna hats, and more.
 Prebuilt
 Sauna Brushes
 Vents
Vents