
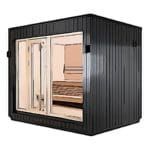
How To Build a DIY Sauna Door
Creating a DIY sauna door is a rewarding and achievable project that can enhance the aesthetic appeal and functionality of your sauna. This guide will walk you through the process of creating a sauna door with cedar tongue and groove paneling on both sides of a plywood core – installed vertically on one side and horizontally on the other. The vertical and horizontal arrangement not only enhances visual interest but also improves the door’s stability and strength.
Total Time 4 hours
-
Measure and Cut Your Plywood Core
The plywood core will serve as the main structure of your sauna door, providing rigidity and strength. The first step is to measure the dimensions of your sauna door opening. The plywood core should fit perfectly into this space. After measuring, mark these dimensions on your plywood and cut it accordingly.
-
Plan the Cedar Paneling
Next, plan the cedar paneling. The cedar paneling will be attached to both sides of the plywood core – vertically on one side and horizontally on the other. Measure the width and height of your plywood core to determine the number of cedar boards you’ll need for each side. Remember, the cedar boards should cover the entire surface of the plywood on both sides.
-
Cut and Attach the Vertical Cedar Paneling
Cut the required number of cedar boards according to the height of your plywood core for the vertical side. Then, starting from one side, attach the boards vertically to the plywood core using finish nails. Ensure that the nails don’t come through the other side of the plywood.
-
Cut and Attach the Horizontal Cedar Paneling
Next, cut the cedar boards according to the width of your plywood core for the horizontal side. Attach these boards horizontally on the other side of the plywood core. This will create an interesting visual contrast with the vertical boards on the other side.
-
Create and Install the Window (optional)
Now, create the window opening. Mark the desired size of the window on the side with the vertical boards, making sure it’s centered. Then, cut out the marked area with a circular saw. The window can be of any size that suits your preference, but ensure it’s large enough to provide a view without compromising the door’s stability.
-
Install the Door Hardware
Next, you’ll install the door hardware. This includes the hinges, handle, and latch. As a general rule, hinges are typically placed 5 inches from the top and bottom of the door. The door handle and latch should be at a comfortable height for use, usually around 3 feet from the bottom of the door.
-
Hang the Door
Finally, it’s time to hang your door. Mark the locations for your hinges on both the door and the door frame, ensuring they line up perfectly. Attach the hinges to the door first, then hold the door up to the frame and screw the hinges into the frame.
Check that the door opens and closes smoothly. If there’s any sticking or gaps, you may need to adjust. Adjustments might include shimming the hinges for better alignment or planing the door’s edges for a better fit. Remember, patience is key when hanging a door. It might take a few tries to get it right, but the result will be worth it.
-
Install the Window
Next, it’s time to install the window. Measure the window opening and order a tempered glass panel according to these measurements. Remember to account for a small gap around the edges for easy installation. Once your glass arrives, apply a bead of clear silicone around the edge of the window opening, then carefully set the glass in place.
-
Finishing Touches
Estimated Cost: 400 USD
Supply:
- Plywood: One piece of ½ or ¾" plywood to the size of your door.
- Cedar Tongue and Groove Paneling: Enough to cover both sides of the door. You will need 5-7 pieces at 6' 3" for the verticals and 13 pieces at 24" for the horizontals.
- Foil Vapor Barrier: This is optional and depends on personal preference. If you choose to use it, you will need enough to cover one side of the plywood.
- Finish Nails: Enough to set the cedar panels onto the plywood.
- Screws: 2" screws to secure the cedar panels to the plywood, and 3" screws to assemble the door jam.
- Wood Glue: For securing the cedar trim into the door end seam.
- Sauna Door Window: This is optional and the size depends on personal preference. The guide does not provide specific dimensions, but you could consider a standard size like 12" x 12".
- Hinges: The quantity and size will depend on the weight and size of your door, but two or three sturdy door hinges should suffice.
Tools:
- Table Saw: For cutting the cedar tongue and groove paneling and for making trim for the door end seam.
- Circular Saw: For cutting the plywood and for cutting out the window opening in the door.
- Jigsaw: For completing the cuts for the window opening.
- Drill: For pre-drilling holes for screws.
- Screwdriver or Drill with Screwdriver Bit: For setting screws.
- Hammer: For setting finish nails into the cedar paneling.
- Straight Edge/Ruler: For measuring and marking where to set screws.
- Pencil: For marking measurements and screw positions.
- Saw Horses or Work Table: For supporting the door while working on it.
- Shims: For creating a gap when building the door jam.
It’s important to remember that hanging a sauna door may require some adjustments to get it right. You’ll likely need to shim the door in place and make fine adjustments to ensure it swings freely without rubbing against the jam. But with patience and precision, you’ll have a custom-built sauna door that not only looks great but also functions perfectly. And you can take pride in knowing you did it all yourself.
Want to buy a prebuilt all glass or wood sauna door? We can help with that too! Buy your sauna door here.
-

1X4 Alder STS4 T&G Wall Cladding – Sauna Wood by Thermory
$2.96 – $177.62 -

1X4 Black Thermo-Spruce STS4 T&G Wall Cladding – Brushed & Waxed Black Sauna Wood by Thermory
$4.27 – $251.00 -
")
1X4 Thermo-Aspen STS4 T&G Wall Cladding – Thermally Modified Sauna Wood by Thermory
$2.85 – $170.67 -

1X4 Thermo-Spruce STS4 T&G Wall Cladding – Thermally Modified Sauna Wood by Thermory
$1.73 – $101.72 -

1X5 Alder STS4 Wall Cladding – Natural Sauna Wood by Thermory
$3.83 – $230.20 -

1X5 Brushed Black Alder STS4 Wall Cladding – Sauna Wood by Thermory
$4.56 – $268.00 -

1X5 Thermo-Aspen STS4 Wall Cladding – Thermally Modified Sauna Wood by Thermory
$3.93 – $236.00 -

5/4 x 4 SHP Alder Bench, Backrest, and Skirt Sauna Wood
$4.32 – $172.80 -

Alder 5/4×3 STEP Wall Cladding – Sauna Wood by Thermory
$3.72 – $223.97
 Prebuilt
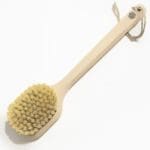 Sauna Brushes
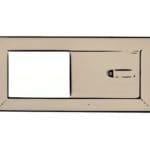 Vents
Vents