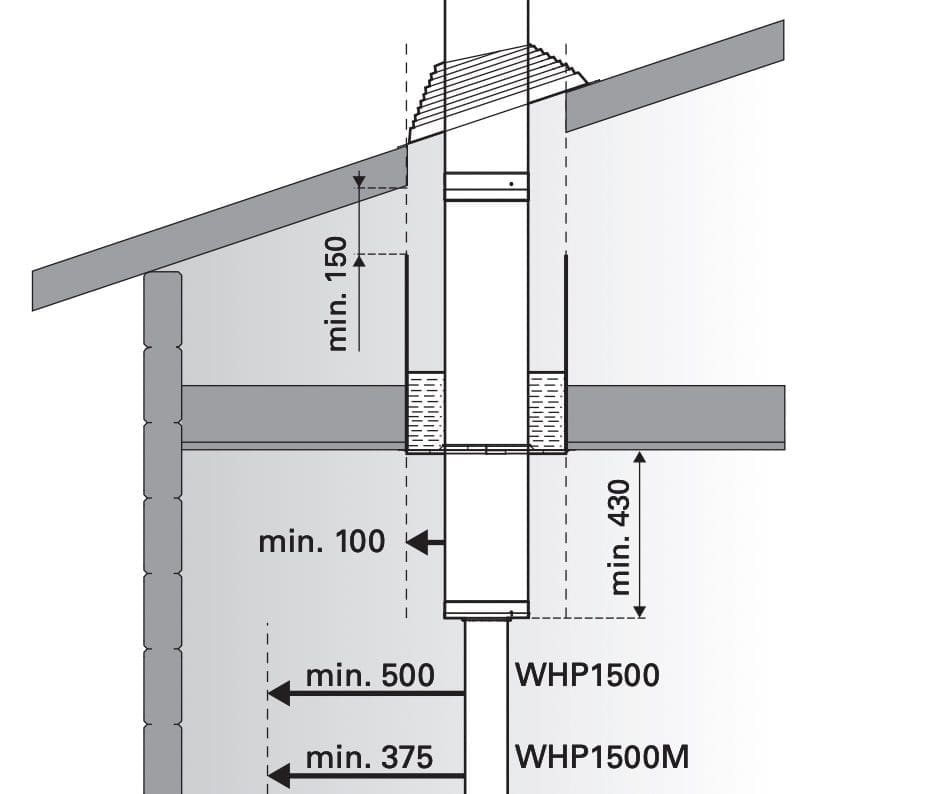
Harvia Chimney Clearances
WHP1500 and WHP1500M
Rain Flange with installation set
Rain Cap (not pictured)
Lead through insulation and protector
Smoke pipe
Lead Through Flange
1 Meter Chimney Extension (Sold Separately)
Safety Distances
It is absolutely necessary to install the chimney according to these safety distance values. Neglecting them causes a risk of fire.
- There shall be no inflammable materials within the established safety distances.
- The safety distance between the inflammable structures and the chimney outer casing must be minimum 100 mm.
- If the connecting pipe in the forward end is of non-isolated material, the safety distance from this pipe to inflammable construction materials needs to be 375 mm (WHP1500M) or 500 mm (WHP1500).
- The isolated chimney should be visible up to a minimum of 430 mm.
- When the fireplace is used a considerable heating takes place and the chimney needs to be protected with e.g. steel mesh in case it is exposed to touch. The protection, however, should not interfere with the ventilation around the pipe. There is no need for protection if the chimney is installed in a sauna.
- Do not encapsulate the chimney.
According to the Harvia Manual, the maximum nominal chimney gas temperature of the furnace joint is 600 oC.
As per the Harvia Manual, the cross-section of the CHIMNEY is round and the diameter 220 mm.
Note, the section directly above the sauna stove is called the smoke pipe.
The diameter of the smoke pipe is 115 mm and it is made out of 0.7 mm stainless steel.
The outer casing material is 0.5–0,6 mm stainless steel (source: Harvia Manual)
The insulation material is mineral wool.
The maximum height of the steel chimney is five meters while the permissible maximum for the self-supporting element (e.g. the element above the roof) is two meters.
Consult your local building department to confirm adherence, and to learn how far above the roof your chimney must extend.
The steel chimney can only be mounted in a vertical position.
Designing a Harvia Chimney System
Every part on this page belongs to Harvia’s modular WHP steel chimney system: a 115 mm (4.5″) smoke path inside a 220 mm (8.6″) insulated casing, assembled with slot-and-lock joints. Here is how a complete system comes together:
- Start with the chimney. For pitched roofs, the WHP1500 kit (1500 mm chimney plus rain cap, tilted rain flange, smoke pipe, and ceiling lead-through set) is the core of the system. For flat roofs and barrel saunas, the WHP1000500 package bundles the chimney with the symmetric roof kit.
- Connect the stove. Bridge the stove collar to the insulated chimney with 115 mm WZ smoke pipes (20 cm, 50 cm, or 1 m). Add the WZ115030SP damper plate at the stove to control draft while firing, a WZ115120 reducer where pipe sections step down, or the WZ115155 adapter if you are transitioning to 6″ US Class A pipe.
- Reach your height. Add WHP500 (500 mm) or WHP1000 (1000 mm) extensions. Stay within Harvia’s limits: 5.0 m (16.4 ft) total chimney height, no more than 2.0 m (6.5 ft) above the last support, lateral supports every 3.0 m (9.8 ft).
- Go through the roof. Choose the roof kit that matches your roofline — WHP-AS for tilted/pitched roofs, WHP-ASSYM for flat roofs and barrels. Replacement rain collars: WHM22 (tilted) and WHM24 (symmetric). Add a snow barrier above the chimney where sliding snow can load the flashing.
- Seal and control. The WHM25 vapor barrier restores the vapor-tight layer where the chimney passes the sauna ceiling; the WHP270 insulated damper closes the flue after the fire is fully out so the sauna holds its heat.
- Finish the stove side. Stone-filled covers — WL300 for Legend stoves, WL300PC for Cilindro — absorb radiant heat from the smoke pipe and significantly reduce its required safety distances.
Key clearances and rules: vertical installation only; 100 mm (4″) from the insulated casing to combustibles; 500 mm (stainless) or 375 mm (black) from non-insulated smoke pipe unless shielded; designed for wood-burning stoves in standalone outdoor sauna buildings. Confirm your plan with your local building authority — and if you would like help speccing the system, talk to us; we design these daily.
Shop the Complete Harvia Chimney System
1. Start with the chimney
- WHP1500 Chimney Kit, 1500mm (stainless or black) — the system core (this page)
- WHP1000500 Complete Chimney Package for flat roofs & barrel saunas
2. Connect the stove
- WZ Smoke Pipes, 115mm (20 cm / 50 cm / 1 m, stainless or black)
- WZ115030SP Stove-Side Damper Plate (draft control while firing)
- WZ115120 Reducing Pipe (joins mismatched pipe sections)
- WZ115155 Adapter, 4.5″ Euro to 6″ USA (hybrid Class A transitions)
3. Reach your height
4. Go through the roof
- WHP-AS Roof Accessory Kit for tilted / pitched roofs
- WHP-ASSYM Roof Accessory Kit for flat roofs & barrel saunas
- WHM22 Replacement Rain Collar, tilted roofs
- WHM24 Replacement Rain Collar, flat roofs & barrels
5. Seal and control
- WHM25 Chimney Vapor Barrier (seals the ceiling penetration)
- WHP270 Insulated Smoke Damper (retains heat after firing)
6. Finish the stove side
- WL300 Smoke Pipe Cover for Legend stoves (cuts clearances)
- WL300PC Chimney Cover for Cilindro stoves (cuts clearances)

Prebuilt
Sauna Brushes
Vents