How to Build a DIY Barrel Sauna From Scratch in 2024

Building a Barrel Sauna can a be a fun project that will provide years of ‘sweat equity.’ However, it is a major undertaking and the truth is, most people never finish the project, or wish they had bought a barrel sauna kit instead. We’ve been there, and we want to make sure you know what you’re getting into.
At minimum, we hope after reading this you will add up the cost of materials, and consider the amount of time you will put into the project. Consider that you can buy a thermally modified barrel sauna kit from Europe with perfect joinery, thicker staves, a shingle roof, LED light kit, and shipping for under $5k USD.
If you’re not using Thermally modified wood and a shingle roof on your DIY build, these will last and perform better.
At least give it a look, and see if you’re wasting your time and money.
Barrel saunas (from scratch) require joinery methods that are not for first-time woodworkers. Even seasoned carpenters with the right tools will spend 10x as much time building a DIY barrel sauna from scratch as assembling a barrel sauna kit.
Here’s why building barrel sauna from scratch is so labor intensive.
A barrel sauna that is just 6′ in diameter by 5′ long (a pretty small 2 person barrel sauna) will require 1,200 board feet of routing, and 42 precise dado joints. If you’re trying to save money make sure to factor in your hourly rate and any tools you’ll need to buy (see tool requirements below).

So unless you’re looking for a cool woodworking project, or have local cedar in abundance – you may consider a custom barrel sauna, or buying a barrel sauna kit instead. You can find a barrel sauna builder, or get some inspiration right here on Sauna Marketplace with custom quotes from sauna builders.
With that out of the way, if you still want to know how to build a barrel sauna from scratch then here’s our guide (Barrel Sauna Plans PDF coming soon).
Tools You’ll Need
If you check out DIY barrel sauna videos on YouTube, you’ll notice that theres often huge gaps in the joints. The right router bits are essential to building a barrel sauna that will keep heat in and last. We’ll dig into how to build a barrel sauna, but let’s get the look at what you’ll need to be successful.
- Router Table (Link)
- Stave Cove Bit (Link)
- Stave Bead Bit (Link)
- Wall Groove Bit (Link)
- Planner (Link)
- Table Saw
- Dado Blade Set for Table Saw (Link)
- Flat Sander, not orbit (Link)
- Rubber Mallet
- Carpenter’s Hammer
- Cordless Drill
- Carpenter’s Level
- ¾” Wrench
- Tape Measure
- Miter Saw
- Jigsaw
- Drill
- Shaper tool to remove lip
You May Also Need
- Tamper to prepare ground
- 6′ Step Ladder
Materials List
- Stave Stock: 2×6 lumber (aprox 50 for staves, 30 for walls) – 6′, 8′, or 12′ depending on sauna length. You will lose a few inches on each side for the wall overhang.
- Wall Stock: Tongue and groove, v-joint, and framing
- Barrel Sauna Wire Rope (link)
- Barrel Sauna Rope Clamps (link)
- Barrel Sauna Turnbuckles (link)
- Screws / Nails (Stainless Steel!)
- Stove – Wood or Electric
Sourcing Lumber
Perhaps the biggest draw of building from scratch is the ability to use local materials – just like resourceful Finns have done for generations. Keep an eye on local lumberyards and Craigslist for good deals. Make sure you’re finding responsibly sourced lumber.
Heat treated wood, also known as thermowood is popular for barrel saunas in Europe, and is a good way to make sure any insects and fungi are killed off. Avoid any pressure treated lumber that could turn your sauna into a chemical bath.
Ideally you want tight grain or clear wood but you will spend more depending on how many knots you’re willing to put up with.
Best wood for DIY Barrel Sauna
- Western Red Cedar (Popular in Canada, US) – You can use clear cedar (ideal) or tighly knotted for a woodsy/cabin look. Cedar will be the most naturally resistant to mold and rot, and emits a desirable smell when heated. Used by Almost Heaven, Aleko, and most other North American barrel sauna manufacturers. This is definitely the recommended choice but you can have great results with other (less expensive) species and protect the sauna by adding a roof and elevating it way off the ground.
- White Spruce (Popular in Finland)
- White Pine (Used by Aleko)
- Black Alder (Used in Finland)
- Fir or Hemlock – Used by Almost Heaven.
- Aspen – especially heat treated aspen is common in Finland
Regardless of exterior, stick with Aspen, Cedar, or Basswood for the benches (more on that later).
Regardless of wood species, you want to make sure the boards are straight, don’t have large knots that, and have low moisture content.
Measure the wood’s moisture content should be below 12%. If there’s too much moisture in the wood, it will dry out and shrink after a season or two. You can find a digital moisture reader on Amazon for about $30.
Any knots should be tight and solid. Avoid rotted out knots, especially if you can see through them or they might blow out. Knots can lead to warping or produce sap. Often, it’s effective to get longer boards than you need so you can cut out some problem areas. If your lumber yard allows sorting, spend some time picking out the straightest boards with the fewest knots. You can often find beautiful sections of clear cedar among #2 or #3 grade stock.
If you do encounter lumber such as pine that’s prone to sap, also known as ‘pitch’, you can still use it. All conifers will produce sap and it’s perfectly normal to see some with a new sauna. Just use a razor blade to scrape it away. Once it seeps from the wood it will not return.
Hot To Build a Barrel Sauna Step 1 – Prepare The Wood
Stave Joinery
Most diy barrel sauna builders use a bead and cove joint for the staves, also known as a canoe joint. The allows the staves to fit together nicely while still allowing them to hinge into the barrel shape.
Run your stock through the router table using 1/2″ radius bead and cove router bits starting with the bullnose (convex) side. With 1 1/2″ wood stock, this will leave a small shelf that allows the hinge seat properly.
Each board will need to be run through the router table 4 times. This is the most time consuming task of building your barrel sauna from scratch. This video shows the same joinery process for staves in a barrel hot tub (yes, building a barrel with these joints can actually be water tight).
Use shaper tool to remove lip and rough spots from bullnose side of stave. They should be nice and round.
Your bottom stave should have two convex edges and the top should have two concave edges. This is done to help prevent water from leaking.
Dado Joints
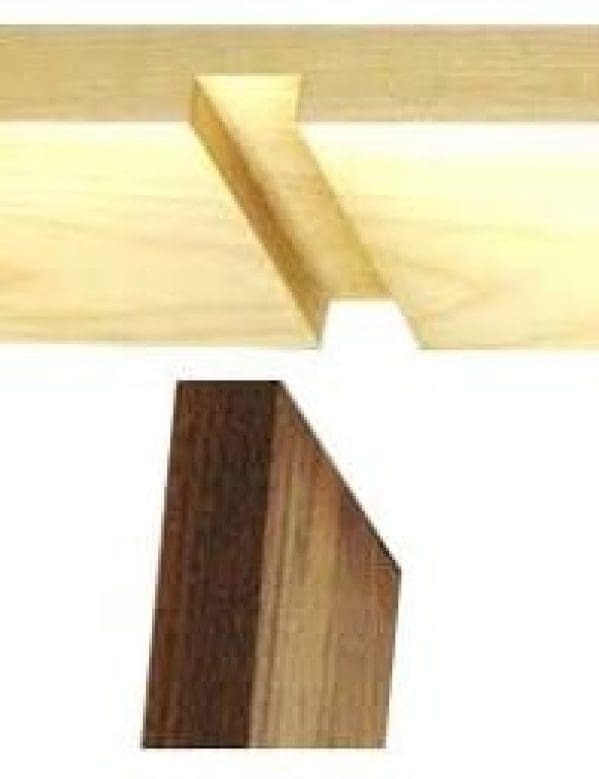
Staves also need dado joints on each end where the staves will attach to the walls. If desirable, these joints will make it possible to not use screws or nails through your staves. The cuts need to be the width of your wall stock.
You can cut these joints with a table saw, router, or by hand. If using a table saw, a dado blade will make it much easier, cleaner, and safer but you can get by running it through a few times and chipping away at it.
With a router table and a straight cutting bit, it is possible to cut several of these joints at once.
Test every joint to make sure your wall stock will fit snuggly in the dado joint. It’s better to correct any problems now than when assembling your sauna.
How to Build a Barrel Sauna Step 2 – Build The Walls
First you have to build your walls. You might have to do this on site if transporting a 6×6′ (or larger) circular wall will be a problem.
Lay out your 2×6’s (or whatever you’re using) so you can cover a 6×6 circular diameter. Interlock the tongue and groove joints together so it covers a larger area than the diameter needed.
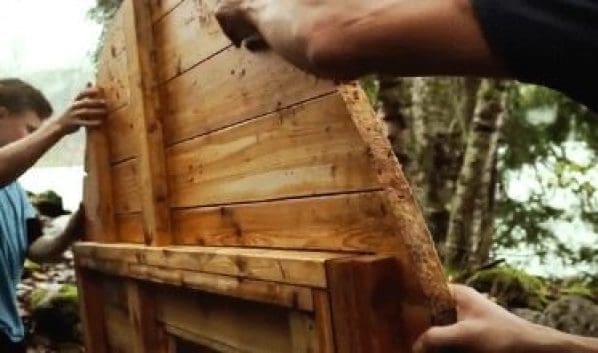
Whether using 8 or 12′ boards, you can rough cut some of them now to give yourself scrap pieces for the top and bottom boards which can be much shorter than the middle ones.
Once the wall are assembled, cut them into circles. Ideally, you’ll have a template you can run your router around. If not, a skillsaw with scrapwood can be used to rotate around the center.

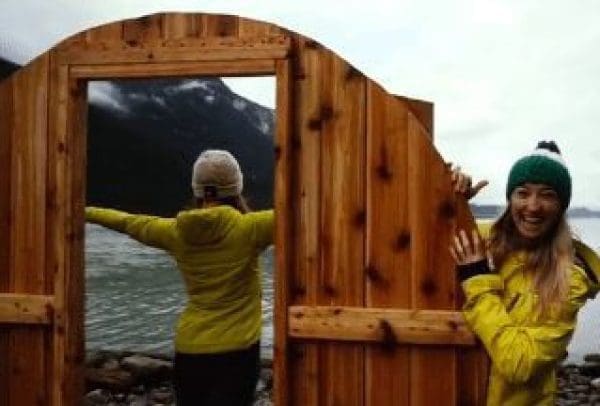
One of the walls will require a door. It’s easiest to build the wall, then cut out and frame the door. You will want to frame out the door using 2x4s to provide structure. Do the same if adding any windows. We recommend a large window on the door since it won’t require additional structural framing of the walls.
Assemble Your Barrel Sauna
Congratulations! You’re onto the fun part. Before beginning the assembly phase, make sure you have the following ready:
- Barrel Bases / Cradles (2-3 depending on length) with exact center marked
- Walls (2-3 depending on changing room)
- Staves (circumference / final stave width when put together
For the remaining steps, you can learn a lot from barrel sauna manuals or videos showing the assembly of prebuilt barrel sauna kits. You’ll probably also find some ways you can improve your design, and good tips to incorporate. This video shows the guys from ‘Ball and Buck‘ assemble their Almost Heaven barrel sauna kit.
Prepare the Location
First you must make sure you are putting your barrel sauna on solid, flat ground. It should be firm and flat. A slight incline is OK and may actually assist drainage.
We recommend a well-tamped gravel base, concrete pad or solid deck. Patio stones are a good idea to place under the cradles if using a gravel base.
How much effort you put into the base should reflect how long you want the barrel to stay at that location. If you’re going to bring your barrel sauna to the cabin every summer, you might not need to spend a lot of time here.
Place the Cradles, Set Your First Staves
Roughly place the cradles and place your first stave (usually smaller than the other staves) with a carpenters level across it. Now adjust the cradles until lined up straight and level.
Attach the first stave to the cradles, and place enough staves to cover the cradles, gently tapping into place and ensuring an even, tight fit. The dado joints must align perfectly.
Set The Walls
Stand up the walls and temporarily place a couple staves on top to hold them in place. Make sure the walls are perfectly straight, especially on the door side.
Insert the Staves
Put one stave in at a time until you reach the top, again making sure the dado joints line up perfectly. Alternate staves between sides so you’re going up evenly.
There should be no gap at the top, but it’s ok if it’s bowing out a little, you’ll fix that when tightening band.
If there is a gap, you may need to get creative and rip a stave with a tablesaw, or add filler staves.
Tighten
Use straps to tighten the whole things together. If you used nails to attach the staves, place a band over them.
Work out any uneven areas by tapping on them from the outside with a mallet.
Build Benches
It’s probably best to wait until this point to start planning your benches. Regardless of exterior wood choice, you’ll want to use Aspen, Cedar, or Basswood for the benches.
Heat It
You should already know if you want an electric or wood burning stove. Install it following local codes and manufacture’s recommendations on clearances, chimney, and venting.
Have any tips on how to build a barrel sauna from scratch? Reach out!


 Prebuilt
 Sauna Brushes
 Vents
Vents