
How to Add Mechanical Downdraft Ventilation to Any Electric Sauna

Most saunas we sell on Sauna Marketplace rely on gravity ventilation, also known as passive ventilation. It’s pretty simple: Heat rises, so the top of the sauna has higher pressure. Some of the air escapes through an adjustable hatch, usually on the opposite corner from the heater.
In a basic sauna kit, that exhaust vent is typically high on the wall like this:

Because higher-end, fully insulated saunas are more air tight, that exhaust vent location can be located lower on the wall. Typically below the bench like this:

Sidenote: cheaper sauna kits without a good air seal wouldn’t benefit from such a low exhaust vent location because they are not air tight enough – most air would exhaust from gaps and cracks higher on the wall. Then this lower ‘exhaust vent’ would become an intake vent, causing a cold spot on the bench above it.
So as the high-pressure air escapes the sauna through the exhaust vents, fresh air is pulled in to replace it. In a well designed and balanced sauna, this air will enter the sauna at an intake vent located near the sauna heater.
In a passive/gravity fed system this intake location needs to be low on the wall to properly function.

What’s Wrong with Passive Sauna Ventilation?
Passive, gravity-fed ventilation is tried and true. It is effective at bringing in fresh air, while removing stale CO2 heavy air. It’s also very good at keeping the heater operating at safe temperatures.
But it doesn’t guarantee air is exchanged fast enough to remove CO2 levels. CO2 is introduced from humans breathing. The more humans, the more CO2 an the larger the sauna should be. If CO2 levels get too high in a sauna it can have a negative impact on the experience and even be dangerous.
Passive ventilation also contributes to heat stratification, where the top of the sauna is hot and stale, while the bottom is cold. Stratification always exists in a sauna, but passive ventilation often makes it worse.
Note: There are really well designed and balanced passive ventilation systems that promote a ‘convective loop’ that reduces heat stratification. A prerequisite for one of these systems is a perfectly well air sealed wall – typically a taped radiant barrier behind the wall cladding.
Should I Add Mechanical Ventilation?
Passive ventilation ensures minimum airflow is met. However, most electric saunas can be improved by mechanical downdraft ventilation in three ways.
- A well-designed mechanical ventilation system can reduce heat stratification by forcing hot air lower into the room.
- Guarantees a supply of fresh, oxygen rich air.
- Makes it easier to dry out after use.
We recommend using your sauna with passive ventilation for a few months first. Get to know how it reacts and flows. Figure out where air is entering, and existing. If you feel it can be better, then add mechanical ventilation.
Choosing Exhaust Vent Location
It’s pretty easy to DIY a mechanical ventilation system to any sauna. The concept is easy. Using a fan we want to flip the script. We want air to enter the sauna from higher on the wall, and exit lower.
Let’s start with the exhaust location, as it’s always about the same.
In the opposite corner from the heater, you want to force air out of the sauna just below the foot bench. This is usually 12″ to 18″ above the finished floor.

The reasons for this location are:
- It works with the natural convective loop in a sauna. In an ideal sauna heat rises at the heater, works its way across the ceiling to the opposite wall, and drops as it cools on that wall. This is what makes a sauna really good, so we want our mechanical ventilation system to work with not against these sauna dynamics.
- Loyly preservation – we want the good steam to envelope the bather and last a little longer by not exiting right away out the top.
Choosing Intake Vent Location
For most heaters in North America, you will want to keep the standard air intake recommended by the manufacturer. This is usually next to, or under the heater. For these heaters, there may be an internal overheat protector that will cause nuisance trips if there’s not fresh, cool air coming through the heater.
This intake location has the potential to “short circuit’ your mechanical ventilation plans if air enters the sauna below the heater and makes a straight line for the exhaust location. Getting the fan speed just right will be important. Or you could try the following.
If you have a HUUM heater (doesn’t have that internal sensor), or you want to experiment with a second air intake location then you should introduce fresh air above the heater.

2/3 to 3/4 the distance between the top of the stones and the ceiling is a good placement.
How to add Mechanical Ventilation to a Sauna
This guide will walk you through the set up of a DIY downdraft mechanical ventilation for any sauna, indoor or outdoor. It’s based on a successful implementation shared by a friend of Sauna Marketplace.
Components
- Fresh Air Intake Vent, one fixed or two adjustable. Typically 3.5″ or 4″ round holes with metal duct through wall.
- 6″ Mechanical exhaust vent.
- AC Infinity CLOUDLINE A6 inline fan and damper
- Weatherproof storage box
- Vent covers and grilles.
- Ducting and connectors for fan
Note: 6″ exhaust duct and fan is intentionally oversized here. It’s quieter and performs best to run the fan at lower speeds with larger openings.
Steps:
- Plan Your Ventilation Layout:
- Position the fresh air intake above the heater.
- Place the exhaust vent under the benches, about 18″ from the floor.
- Ensure the exhaust is on the opposite wall from the intake for optimal airflow.
- Install the Fresh Air Intake:
- Cut a 6″ hole in the wall above the heater.
- Install the vent cover on the interior and exterior of the sauna.
- Install the Exhaust Vent:
- Cut a 6″ hole under the benches, approximately 18″ from the floor.
- Install the vent cover on the interior of the sauna.
- Prepare the External Housing:
- Choose a weatherproof storage box large enough to house your inline fan. (60-gallon size recommended for 6″ systems)
- Cut appropriate holes in the box for the ducting.
- Install the Inline Fan:
- Mount the AC Infinity CLOUDLINE A6 fan inside the storage box.
- Connect the fan to the exhaust vent using appropriate ducting.
- Install the Backdraft Damper:
- Place the AC Infinity backdraft damper inline between the exhaust vent and the fan.
- This will prevent bugs from entering and improve heating efficiency when the fan is off.
- Electrical Setup:
- Install an exterior electrical outlet near the storage box if not already present.
- Plug the inline fan into this outlet.
- Final Connections:
- Ensure all ducting is securely connected and sealed.
- Double-check that the airflow direction is correct (from sauna to outside).
- Test the System:
- Turn on the fan and verify that air is being drawn from the sauna.
- Check for any air leaks and seal if necessary.
- Optimize Performance:
- Use the variable speed control on the AC Infinity fan to adjust airflow as needed.
- Start with lower speeds to minimize noise and adjust based on your preferences.


Remember, proper ventilation is crucial for a comfortable and safe sauna experience. This system helps manage humidity, temperature, and air quality in your sauna.
Heater With Mechanical Downdraft Ventilation
You’ll still need vents to the outside, but now there are heaters with built in downdraft ventilation systems that pull the hottest air from the ceiling down to floor floor level and mix it with oxygen rich air. We can tell you, this is the best sauna experience we’ve ever had.
It’s called Saunum, and you can check them out here.
 Prebuilt
 Sauna Brushes
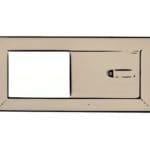 Vents
Vents